Step into the unique universe of Find how to brew excellent espresso at home with Breville espresso creators. Our aide covers everything from arrangement to support, guaranteeing you achieve barista-quality outcomes each time. Espresso with Breville, where gladly claiming an espresso producer will turn into an entryway to changing your at-home blending experience. Breville machines are acclaimed for their unequaled adaptability and accuracy, enabling you to make bistro-quality savors right in your kitchen. Whether you are wandering into the craft of coffee interestingly or refining your gifts as a genius espresso connoisseur, dominating the activity and remodeling your Breville framework is vital. Go along with us as we plunge into complete orders for different Breville coffee creators, guaranteeing you unencumber the whole limit of your coffee-making venture. Get set to blend with confidence and artfulness — welcome to the area of Breville espresso excellence!
Significance of Adhering to Legitimate Guidelines for Breville Espresso Creators
In the steadily developing universe of espresso, claiming a Breville espresso creator can really lift your home blending experience. These machines offer unmatched adaptability and accuracy, permitting you to make bistro-quality drinks directly in your kitchen. Whether you’re a beginner barista or a carefully prepared espresso lover, understanding how to appropriately utilize and keep up with your Breville machine is fundamental. In this blog, we’ll direct you through point-by-point guidelines for different Breville espresso producers, guaranteeing that you remove the most extreme from your espresso process. Thus, prepare to blend like an ace with Breville!
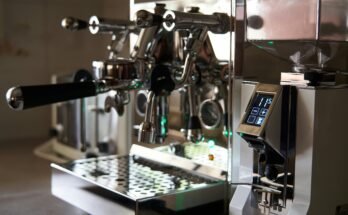
1. Breville Duo Temp Pro Espresso Machine (BES810BSS)
Setup
To start, unbox the Breville Duo Temp Pro Espresso Machine and remove all packaging substances. Next, fill the water tank, portafilter, and steam wand with warm, soapy water. Attach the water filter to the bottom of the tank, ensuring a secure match. Then, insert the tank into the machine.
Making Espresso
First, fill the water tank with clean, cold water up to the MAX line. Then, grind your coffee beans to the desired fineness with the help of an excellent grinder. After that, flippantly tamp the grounds inside the portafilter. Once performed, lock the portafilter into the group head. Following this, pick out your selected shot size and press the best button to start the extraction system. During this time, screen the strain gauge to ensure it remains in the superior range.
Steaming Milk
To steam milk, pour cold milk into the chrome steel milk jug. Position the steam wand just below the milk’s surface and spark off it. As the milk starts to froth, alter the jug’s role to create a silky microfoam. Finally, pour the steamed milk into your espresso shot, crafting a scrumptious latte or cappuccino.
2. Breville Smart Grinder Pro (BCG820BSS)
Setup
First, unbox the Breville Smart Grinder Pro and cast off all packaging substances. Then, smooth the bean hopper and ground coffee field with hot, soapy water. Once dry, attach the bean hopper to the pinnacle of the grinder and lock it into the vicinity.
Grinding Coffee
To begin, fill the hopper along with your preferred coffee beans. Next, pick your preferred grind length using the dial on the facet of the grinder. Then, place the portafilter or ground coffee container below the grinder’s spout. Following this, select your chosen grind time or a wide variety of pictures/cups for the digital show. Finally, press the start button to start grinding. As the beans grind, make certain the grounds fall flippantly into the portafilter or container.
Adjusting Settings
For customization, use the micro-adjustment ring to adjust the grind size. Additionally, adjust the grind time to gain the ideal quantity of espresso for your brewing method. Regularly experiment with those settings to find the best grind for your flavor.
3. Breville Nespresso Creatista Pro (BNE900BSS)
Setup
Initially, unbox the Breville Nespresso Creatista Pro and dispose of all packaging substances. Next, fill the water tank, milk frother, and drip tray with warm, soapy water. Attach the milk frother to the machine and insert the water tank, ensuring it locks securely.
Brewing Coffee
To begin, fill the water tank with sparkling, cold water as much as the MAX line. Following this, insert a Nespresso espresso pill into the specified slot. Using the touchscreen display, choose your preferred espresso length. Press the start button to begin brewing. As the coffee brews, the milk frother will prepare milk concurrently in case you choose a milk-based total drink.
Steaming Milk
For steaming milk, pour cold milk into the milk frother. Next, pick your chosen milk texture and temperature for the touchscreen display. The gadget will robotically froth and steam the milk to your chosen settings. Finally, pour the steamed milk into your brewed coffee, creating delicious lattes, cappuccinos, or other milk-primarily-based liquids.
4. Breville Nespresso Vertuo Creatista (BVE850BTR)
Setup
In the first place, unpack the Breville Nespresso Vertuo Creatista and cast off all bundling materials. Then, clean the water tank, milk frother, and dribble plate with hot, sudsy water. Join the milk frother to the gadget and add the water tank safely.
Brewing Coffee
To start, fill the water tank with clean, cold water as much as the MAX line. Next, insert a Nespresso Vertuo tablet into the unique slot. Using the manipulation panel, select your preferred coffee length. Press the start button to start brewing. The gadget will automatically adjust the brewing parameters based on the capsule you insert.
Steaming Milk
For steaming milk, pour cold milk into the milk frother. Select your selected milk texture and temperature using the manage panel. The gadget will automatically froth and steam the milk to your selected settings. Finally, pour the steamed milk into your brewed coffee, creating perfect lattes, cappuccinos, or other milk-based beverages.
5. Breville ESP8XL Cafe Roma Stainless Espresso Maker
Setup
Begin by unboxing the Breville ESP8XL Cafe Roma Espresso Maker and eliminating all packaging substances. Next, clean the water tank, portafilter, and steam wand with hot, soapy water. Attach the water filter to the tank and insert it securely into the machine.
Making Espresso
First, fill the water tank with sparkling, bloodless water as much as the MAX line. Then, grind your espresso beans to your preferred fineness and tamp the grounds frivolously into the portafilter. Lock the portafilter into the institution head. Select your shot length and press the best button to start the extraction process. Monitor the extraction to make certain it produces a rich, creamy espresso.
Steaming Milk
To steam milk, pour cold milk into the stainless-steel milk jug. Position the steam wand simply below the milk’s surface and prompt it. Froth the milk by adjusting the jug’s position to create a silky microfoam. Finally, pour the steamed milk into your coffee shot, crafting a delicious latte or cappuccino.
Conclusion
In conclusion, studying the art of using your Breville espresso maker or frother can extensively enhance your coffee enjoyment. By continuously following these designated instructions, you ensure that every brew is perfect and your device stays in the most excellent circumstances. Moreover, retaining a regular cleansing habit will extend the lifespan of your equipment, allowing you to experience extraordinary espresso liquids for years to come. Whether you are a beginner or a pro barista, these Breville machines offer the flexibility and control needed to create café-nice drinks at home. Furthermore, embracing the journey of espresso-making with Breville allows you to relish the rich, aromatic flavors that these first-rate machines can produce. Ultimately, glad brewing!